Google Configuration
Google provides an OAuth 2 and OpenID Connect APIs to allow customers to use their Google identity for authentication. This does require some configuration on the Google side as well as configuring SIFF.
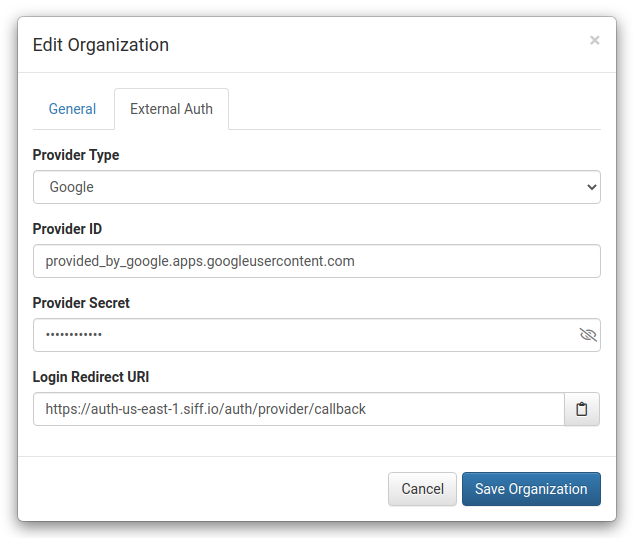
Start SIFF Configuration
First begin by editing the organization within SIFF and selecting Google as the provider type. The dialog will update with some additional fields as shown below. For now do not worry about the Provider ID or Provider Secret, these will be provided once the Google configuration is completed.
Keep this open for now, continue below with a new browser tab/window.
Setup Google
Now we'll need to configure the Google side. Refer to Google's OpenID Connect documentation for complete details however the following steps should guide through the necessary configuration. These steps must be performed by a google user with appropriate administrator privileges.
- Launch the Google API Console. This will take you to the Google Cloud Platform -> API & Services dashboard.
- Create a new project for SIFF authentication using the Create Project button. Call the project "SIFF" and make sure to select the correct Organization (possibly only one, but if your company has multiple managed domains there will be more than one option).
- Configure the OAuth consent screen. When SIFF redirects to Google for authentication the
consent screen is shown so that users are aware.
- User Type: select Internal and then Create
- OAuth consent screen (step 1):
- App name:
SIFF - User support email: contact within your organization regarding SIFF
- App logo: leave blank
- Application home page:
https://siff.io - Application privacy policy:
http://docs.siff.io/legal/privacy/ - Application terms of service:
http://docs.siff.io/legal/terms/ - Authorized domains:
siff.io - Developer contact: contact within your organization regarding SIFF
- Save and Continue
- App name:
- Scopes (step 2):
- Add the following scopes:
/auth/userinfo.email/auth/userinfo.profileopenid
- Save and Continue
- Add the following scopes:
- Summary (step 3) - continue back to the dashboard
- Setup credentials. On the Credentials page, click the Create Credentials button and select
OAuth client ID
- Application type: Web application
- Name:
SIFF - Authorized redirect URIs: copy and paste the Login Redirect URL from the External Auth tab in the SIFF Edit Organization dialog
- Click the Create button. This will pop up a dialog showing Your Client ID and Your Client Secret. These will be needed to complete the SIFF side of the configuration.
Complete SIFF Configuration
Switch back to the SIFF Edit Organization dialog:
- Copy the Your Client ID into the Provider ID field.
- Copy the Your Client Secret into the Provider Secret field.
- Save Organization to save and close the dialog.
With the configuration complete refer to the External Auth - Configuring Users section to switch/invite users to use the external authentication provider and test it out.